Tuesday, May 1, 2018

Growing Green Hair and All Things Summer

Thinking Green and All Things Summer!

It's that time of year when we look forward to being outside in warm weather, blue sky, green grass, and summertime. I am looking forward to activities such as planned vacations,  Chalkfest, gardening, biking the Green Circle in Stevens Point, and hiking up Rib Mountain behind the chalet, to name a few.
Granite Peak Ski Hill, a little slice of summertime Heaven.
The ski chalet really is somewhere at the bottom.


Participating in our local Chalkfest is a great way to take part in a community event as well as discover muscles you didn't know you even owned! (2016)


"Chalking" on the sidewalk is a fun way to grow as an amateur artist. 
Growth Mindset in action!


This is one of my favorite parts of the Green Circle in Stevens Point, Wisconsin. We are so lucky to have this bike trail so close to our community!

But my absolute favorite activity that I'm looking forward to is spending time with my sweet Grand-Kiddos! Two of them!! I foresee lots of travel time to get to these two...each within two hours in opposite directions of Wausau but so worth every mile!
My kids (both successful alumni of the Wausau School District) and their kids! 
First time the new cousins "met" each other!

Some Green What?
We also realize there's still a month of learning ahead of us and engaging students can often become that much more challenging! What better way to bring in some of that anticipated summertime than to grow some Green Hair? Throw in a little bit of scientific inquiry, a bit of observational writing and journaling, a little bit of gardening, and a lot of hands-on!  What kiddo can resist doing Grass Heads?


 Materials to Have on Hand:
All you need is a plastic cup (we used 3 oz. size), a nylon knee high, wood shavings, potting soil, and rye grass seed. Perhaps an eyeball or two. And yarn for pigtails if you want to be stylin' some long green hair! It should be noted that after a number of heads lost their eyeballs, it was discovered that a touch of hot glue (done by an adult only) is the best way to keep them from popping off the head and rolling away! 

How-To:
First, place a teaspoon of rye grass seed in the toe part of the nylon followed by a small scoop of dirt. 
Pull nylon over a larger cup (than the 3 oz.) to 
make the insertion process easier.


Scoop in enough dirt to completely cover the seeds
and give the grass roots some soil to dig into.


The remaining space is filled with wood shavings (found in a pet supply area). The head should be filled full enough so that it looks kinda like a potato. 


Animal Bedding Wood Shavings
A layer of seed, soil, and wood shavings.

Tie off the nylon with a rubber band or simply tie the tail in a knot.  The head will sit mostly on TOP of the plastic cup with only a small bit pushed inside for balance.  The excess nylon will hang down into the water filled cup. If there is a lot of excess nylon, some may need to be trimmed off but it's important to leave it long enough to access the water. This will act as a self-watering system. 


The freshly seeded head will need to be initially watered enough so the seeds and dirt are quite moist. Thereafter, students will need to monitor their cups and add water as it evaporates and possibly re-wet the head if it should become too dry.


All we need now are some eyeballs and a puffball nose.

Grass Head Journals:
Students keep a "Grass Head Journal" to record the needed materials, list step by step procedures, and a couple hypothesis/inquiries of this activity. The journal also contains space to write daily observations, draw sketches, and anything additional done to the heads such as turning  or watering them.
Great place to keep track of all steps,
inquiries, and observations in one spot.
Lots of detail!

The Outcome:
Students were super excited as the green grass hair started to sprout! Observing their Grass Heads is the first thing they want to go see in the mornings.

Little baby sprouts have popped up giving evidence that growth is taking place!

Even if spring has had a big challenge making its way to north central Wisconsin this year,
we have our oh-so-green Grass Heads in the classroom to make up for it!


Looks like we have some shaggy grass heads badly in need of some fashion stylin'.

Students were even more excited when the day finally came for some hair stylin' work! There were attempted braids, trims, pig tails, mohawks, and other interesting do's (and don'ts)! 
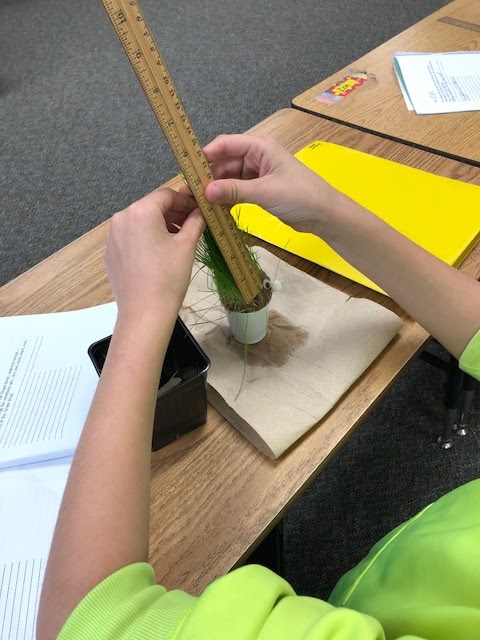
Final measurements before stylin' time begins!
Here we go!

The stylist of this Grass Head said it was styled after his dad's hair! 
And yes, that would be accurate!

The end product CAN be a unique item to give mom for a Mother's Day treat. Kids are so proud of their Grass Heads and what mom can resist a Stylin' Grass Head?


Summer Point of Interest:
One last site to note, especially for those of you local to this area (and extra bonus when you teach latitude and longitude)...if you are interested in standing in the center of the world, there is a small town nearby you won't want to miss checking out! 

Few People Know The Center Of The World Is Actually Hiding In This Tiny Wisconsin Town

Have a safe and fantastic summer!
See you back here in the fall!

Thursday, April 5, 2018

Five Stars-Writing Book and Product Reviews

How often have you used book reviews and product reviews as a "go-to" before making your final decision whether to purchase an item? How many times have you read unhelpful reviews or just as disappointing, found no reviews?

Sometimes the review doesn't even matter as I have unhappily discovered in one case of hotel reviews. Based on a couple decent reviews one summer, I spent a night in a hotel room that looked as if it said, "Welcome to the 1960's" with its pink tiled bathroom, vintage furniture and decor. This interior design was not a purposeful blast to the past, I might add. While I am certainly open to new experiences and exciting adventures, this just wasn't high on my list of "gotta-do's".  I quickly learned that my hotel standards were much higher than the two reviews I read and now I have a strong need to either stay in a well known reputable hotel chain or see pictures first when it comes to hotel rooms!
Image retrieved from https://chuckmantorontonostalgia.wordpress.com

Nevertheless, when it comes to making a purchase, I'm scouring reviews for 4 and 5 star ratings! It seems to me like reviews are a way of life.  I'm grateful to those who take the time to write helpful reviews and I make the effort to give back and do the same for others.

Knowing this is a life-skill, I wanted to teach my students that writing helpful reviews is a positive way to give back. Since my students had recently completed book reviews, the transition to writing a product review was simple. We had already checked many Amazon reviews written on their favorite books. We discussed why reviews are helpful to consumers as well as companies that look for feedback in order to improve their product and processes.

Product Review Guidelines
Similar to book reviews, we discussed the differences between reviewing a book and reviewing a product. Here are some basic guidelines I have students follow in order to write a helpful product review...

*Share any positive things about the product. Just saying, "love it" is not helpful.
*Be helpful and try to answer questions that YOU may have had about the product.
  *Share a tip or trick you learned when using the product.
*If you honestly didn't like the product, don't be rude and bash it. Simply share why you were disappointed. Be honest, kind, and factual.
*Reviews must be clear and concise. Just be genuine, polite, and helpful.
*Proper spelling and grammar is a must in order for readers to see you as someone with credibility.

Using Real Examples
We look at lots of real product reviews on items kids are familiar with and then decide if the review has met any or all of our guidelines. I find Nordstrom reviews to be very user friendly. We began by looking at Nike Presto Extreme Sneaker on the Nordstrom site. Students read the reviews and discuss which ones meet our guidelines and which ones not so much. After reading the reviews and taking a show of hands, the majority of the class was ready to make the Nike purchase for themselves. I admit that I was too!


Another item we looked at was a popular game for 4th and 5th graders on Amazon called Laser Maze. Out of 40 reviews 95% gave the product either a 4 or 5 star rating and 1 person gave it 2 stars. After reading many of the reviews, a show of hands revealed that only 2 students would purchase the product. We discussed why and discovered that the single 2 star reviewer gave such a detailed review of the game's disappointments, students felt it wouldn't be worth the money...even with all those positive reviews. Consumerism 101.


Next we started writing our own product reviews with a simple item that all students are familiar with...the shoes on their own two feet. Many of those shoes are very old friends by this point in the school year. Even if they're brand spanking new, students have at least worn them for several hours and have something to say about them. Students have fun with this review! We do several more product reviews including a review on their desk, their pencil case, backpack, or other school supplies.
There were a few boots mixed in with the majority of sneakers.
Most students seem to love their shoes. 
One boy said he downgraded his 
rating over the weekend due to the fact that his Air Nikes "leaked"!


Students have more opinions 
about their desks than one might think.


Apparently a desirable desk trait is when 
the surface can cool off a warm face!

For their final review I have students choose their own product. Besides being an appropriate item, it must be a product they personally use and are very familiar with. No, since they cannot actually drive yet, they may not write a review on the new family car. Someone asked. The only restrictions I set besides being an appropriate product they use, is that it cannot be a video or any type of electronic device/game.  I have students tell me ahead of time which product they would like to review to avoid anything questionable.

Students used the Book Creator app to type up their product review and added a picture of it onto their iPads. The product reviews are then transferred into the SeeSaw app where everyone's reviews can be accessed by the rest of the class.

Students chose a wide variety of items 
to review and have definite opinions of them.


Students access and read classmates' reviews and respond with two positive comments about the review and one suggestion. Questions can also be asked but I turn off the "like" feature because students tend to become "like happy" and tend to forget the task of writing thoughtful feedback.  Instead, they are to comment on their "big take-away" that perhaps they didn't know before.

Gotta love it when the personality comes out!


I found it works well to  give a sentence starter such as, "This review was helpful because...(give specifics)" otherwise they leave comments such as "You told me about the product." which isn't helpful. Kids absolutely loved this project! They couldn't get enough of reading their classmates' reviews. Many were interested in where to find specific items and eager to try them for themselves!


Too funny, but how true!


It is amazing the variety of products students choose to review. I always end up learning about a product I didn't know of and get excited to check it out...with further reviews, of course! And FIVE stars.

Does anyone else have their class write product reviews? Please share any experiences you've had with this type project.


Thursday, March 1, 2018

Huff N' Puff Challenge-STEM Activity with Literacy

Congratulations to Tera and Sarah, the winners of last month's Biggby coffee gift cards drawing! And a big thanks to Biggby for donating them!

I've always had a fascination for architectural blueprints. Using a protractor, I drew many house designs of my own as a kid. Later, my husband and I built several homes of our own. An exciting part is to walk through new construction once the walls are studded up and see spaces such as where an extra cupboard could be placed that would otherwise be drywalled over. We were also into flipping houses decades before it ever became popular. 


Our first flip back in 1986 in Appleton, Wisconsin. 
We were 22 and 23 years old...crazy kids!!

So when I saw a picture and a one sentence caption of a STEM architecture activity that takes off on The True Story of the 3 Little Pigs by Jon Scieszka I knew I had to explore it further. There were no details so I decided to create my own.

I also read the traditional version
to compare and contrast the two.


After reading the story and using it as an example of first person narration and finding appropriate descriptive words for both the pig (clever, resourceful) and the wolf (determined, strong, tenacious), students engaged in a STEM activity. 

The task involved huffing and puffing and building the tallest but sturdiest model house for the pigs out of toothpicks and marshmallows. Maybe not in that order. And the wolf? A blow dryer. 


Meet Mr. Huff N' Puff himself. The Wolf.

Building Some Background
My goal was to give students opportunity to write detailed descriptive nonfiction through challenge based learning while working on a STEM project. Before beginning their design plan, students watched a clip of Magic School Bus Under Construction to give clues of sturdy construction. Then we read A Skyscraper Reaches Up by Kylie Burns found on the EPIC book app to form an understanding of the Engineering Design Process. 

Planning for Construction
One last piece of research was providing students with "toothpick and marshmallow tower images" online on their ipads. They had many pictures of various toothpick/marshmallow structures to view in order to help them decide how to proceed with their own constructing. Given 25 small marshmallows and 35 toothpicks and armed with some background knowledge of building, students each developed their own plan of construction in descriptive step by step written directions along with a sketch. This was a fantastic time to practice transition words and phrases too...first, next, then... 


Many students were very precise, writing
exactly how they intended to construct.


Students used online images to help 

inform their constructing choices.


Building 

Students were given a zip bag kit with toothpicks and marshmallows and 10 minutes to complete their design. One could almost feel the intensity and concentration of thought process and building action during this timeframe. Several students later reflected they wished they'd had more time, however every student completed the project in the time given. 


Following their plan and beginning the building process.


Many students picked up on 
the strength of triangle power.


After construction was completed, students wrote detailed descriptions and sketches of what their actual structures turned out to be. Then it was time to meet the wolf and find out how many structures would prove to be "wolf-proof"!

Wolf-Testing
The "wolf" stood back 18 inches from the structure and did his best to huff and puff for 10 seconds.  Students enjoyed counting back to keep track of the seconds.

Completed structures ready to be wolf-tested.
The wolf huffed and puffed 18" 
from the structure for 10 seconds.

The Outcome
It was decided that if the structure either tipped over by all the huffing and puffing or was blown over the edge of the table, the wolf succeeded. If the structure stayed upright and did not blow off the table, the structure was deemed "wolf-proof". Most structures were found to be great models for the pigs to safely move into. Students theorized  and reflected that those with triangle bases, wider bases, and those built with stabilizers around the base faired better than those without. 

Students reflected on three thoughts... 
What worked well, challenges that were faced, 
and how to improve the design for the future.

This is definitely an activity to invite the wolf back to do again in the future! Students not only met my goal for learning, but thoroughly enjoyed the project!

Knowing my grown-up kids were coming home over that weekend, I set out leftover toothpicks and marshmallows in bowls thinking they would mess with making something. I wasn't disappointed. My engineer son-in-law was all over the project with quite an extensive model of a bridge. So I discovered that the "big kids" liked it just as much! Success all around. 

Please share if you have used a similar activity of huffing and puffing in your classroom!


Thursday, February 1, 2018

Poetry, Paint, and Gift Cards-Shape Poems

As February rolls around I think of all those cute red, pink, and  heart themed Valentine cards I exchanged as a kid back at Jackson Elementary in the early/mid 70's. I also remember every kids' desktop laden with multiples of decadently iced sugar cookies and scrumptious mouth watering cupcakes decorated with sky-high pink frosting and candy hearts. They were all homemade and sent in by half of the moms for the much anticipated Valentine's Day Party. Not a purchased treat in the bunch that I recall. Far more confectionary bliss than most kids could eat their way through, although some gave it their best. And of which my mom would swiftly but discretely throw leftovers away to avoid more sugar than one child should ever have in a month or five!
When you find your childhood scrapbook is full of vintage Valentines and realize how many of those same classmates you're connected to on Facebook and send their Valentine wishes back to them personally via a front and back picture (with their name they wrote on the back) 40 some years later!

Loving the play on words on these vintage Valentines!
Students had fun reading these.
I received this Ghostie in 5th grade from a classmate
who now investigates the paranormal as a hobby.
He thought it was pretty hilarious when he saw his old Valentine!
Those Valentine Party days have long since changed and all but disappeared, but the creative part of me still craves the February red, pink, and hearts, so I chose to incorporate it into poetry. The fun thing about poetry is that it can be written all year long! So throughout the year we have been working on adding bits and pieces to our poetry books. This particular poetry entry added a bit of artistic painting creativity to the mix, something students absolutely adore,...along with red, pink, hearts, and lots of love!

Learning the Smelly Way...
To prep for this activity, I chose tempera paint and retrieved a gallon jug from our school's shared supply closet. I selected a color and noticed the bottom of the jug was rounded. Weird. That was my first mistake. I set it on my classroom table and continued lesson planning in another space of the room. A few seconds later I started catching whiffs of something absolutely repulsive. What animal could have possibly gotten in the classroom and died??

Quite often I'm teased by family and colleagues that my sense of smell is so sharp I can even smell things "that aren't there". This was definitely there. And I was determined to find it. After checking several possibilities, I turned the cap of the paint jug. Big mistake number two. I succeeded in contaminating my entire classroom with rancid rotten egg smell from an explosion of beyond disgusting pent up fumes. 

I quickly took the offending jug of tainted paint to the janitor's room then tried to mask the scent by spraying the classroom down with disinfectant spray. I won't be purchasing stock in that company any time soon as it didn't work. At all. Students came in exclaiming the room smelled like "gross rotten eggs and bad perfume"! Totally beyond gross.

I have since learned that because tempera paint contains organic compounds that make it safe to use and even ingest, it also means it will eventually spoil. Never return unused paint to the original container after it's been exposed to air. Duly noted.


Paint Swiping Technique

Painting Technique...
A friend shared an easy painting strategy she uses in her many journals and I knew my students would love it. A used up gift card is the tool needed for creating a painted poetry background. The best part is that it doesn't require a sweet forever for the page to dry. Drying is almost instant. Students dip the edge of a used up gift card into paint and swipe down the paper for a shaded background. More than one color can be used on the card at once. Or colors can be painted on separately and a coordinating or contrasting color can be layered on top from a different direction to mix up the look and color tones. This is one technique where less is definitely more. Do not overdo with the swipes.

No two paintings are ever alike.


Rounding up used gift cards is pretty easy. Often stores will have a stack they are willing to donate. Biggby, a local coffee shop, generously gave me a stack of used up gift cards. 

Excitingly, Biggby also donated two (unused) gift cards for a raffle this month. If a Biggby location is near you in the United States, comment on this post AND fill out the entry form at the bottom to enter. (Find Biggby locations here.) Winners will be drawn at the end of the month.

Thank you for supporting education, Biggby!

Writing the poem...
Once the painting is done, comes the poetry fun. For this piece we started with basic sensory stems (this helped out reluctant writers) in keeping with a Valentine type theme. Stems I used included, I love the taste of..., I love the feel of..., I love the smell of..., I love the sound of..., I love the look of... Most students quickly expanded these into their own poetic lines such as "I love the warm sunshine on my upturned face. I love bright red boots and the feel of a well worn denim jacket. I love the scent of fresh laundry on a rainy day."

First write the sensory poem sentences
around the big heart pattern.

Next, cut out the smaller heart
and continue to write more poetry around it.

I gave each student a heart template and had them cut out the biggest heart. Next they began writing their poetry sentences around the heart. Each time they went all the way around the heart, they cut away to the next smaller heart template and kept writing around the smaller heart. In this way they continued to cut away until they got to the middle. Some chose to write a message in the center like those on a candy heart. These turned out to be creative colorful sensory shape poems! A red and pink hearted Valentine memory.
Adding a "candy heart" message in the middle was a fun touch! Several students also drew heart borders around their piece.


Please share if you have a red, pink, or heart themed poetry activity.

a Rafflecopter giveaway